SIGVerse.org | SIGVerse Forum | SIGVerse Web
Sorry! SIGVerse Web is now under maintenance.
Introduction †
SIGVerse Web is a Web Interface for SIGVerse Application Development. Together with SIGViewer, SIGVerse application development can be done without command-line interface terminal (e.g. Cygwin). A light-weight programming editor with multiple languages support is equipped on the system to ease programming jobs. Code compiling (make), building of project files, and execution can be done with just a click. Furthermore, the web-based system also enable development to be carry out anywhere with just an internet browser.
Main feature of SIGVerse Web:
- Web-based Editor and Compiler
- Remote Control SIGServer
- Workspace on the Cloud
Setup †
Register and Login Webuser account †

SIGVerse Installation/Uninstallation †
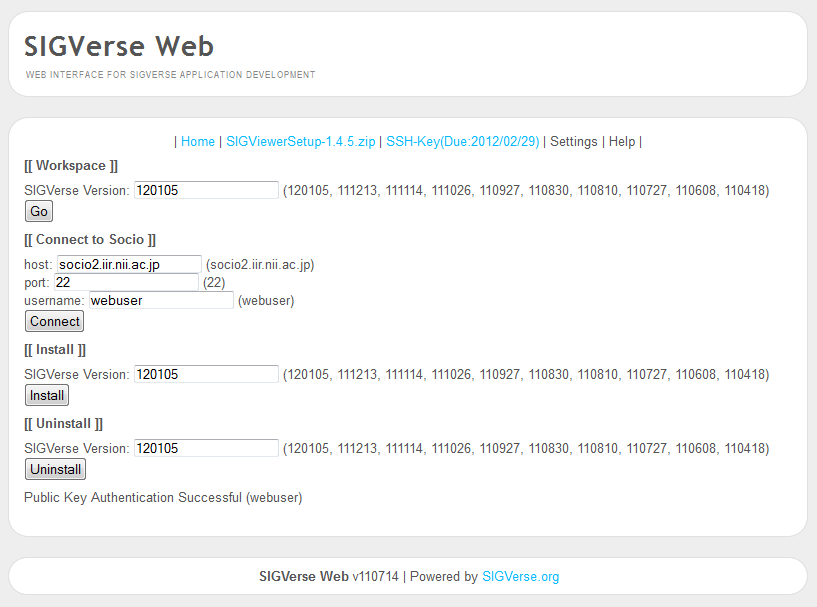
- On the main page, after Connect to Socio, select the desired version and click to install/uninstall SIGVerse.
- *Important* After clicking the Install button, please allow some time (~5 mins) for the processing until a long list of output is displayed. Please do not press any other button during the processing.
- Once the installation is completed, you can click Go to access your Workspace.

* Socio Server Access †
- In order for SIGViewer to visualize your simulation running on Socio server, you are required to have an access account on the server.
- Please contact Professor Inamura (inamura@nii.ac.jp) to apply a permanent access account OR you can use the following method for temporary access (monthly renewal).
- Download the SSH-Key (On the main page after login to SIGVerse Web) and extract the files (id_rsa and id_rsa.pub) into (SIGViewer installed directory)\SIGViewer-<version>\SIGViewer\.ssh folder (* Default directory is C:\Program Files\).
- Please find the passphrase in the passphrase.txt.
- For security reason, the key and the passphrase will expired at the end of every month. Please renew the key at the beginning of every month.
- Follow the guide below (SSH Connection) to establish the SSH connection using SIGViewer.
Basic Development Guide †
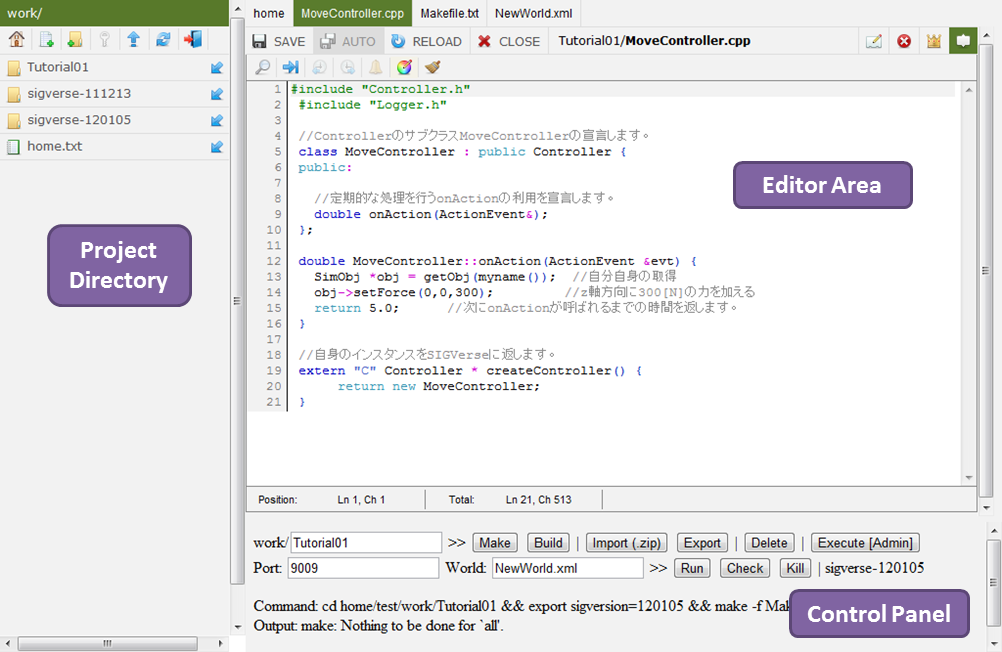
Workspace Overview †

- Project Directory
- The left panel consists of a file navigation for project directory. You can create new project folder and file, upload project file, and even import a whole project (Refer to Import below).
- Editor Area
- The center area is the editor for programming code developments. It supports multiple programming languages with syntax highlight, search and replace, and multi-tab for working of several files in parallel.
- Control Panel
- The lower panel is the Control Panel for code compiling and execution.
- Make - To make controller codes with a Makefile. Please make sure to prepare the Makefile.txt as below (sample):
Makefile.txt
- Build - To "build" the project files into the current SIGVerse version (indicated on the right end of Control Panel).
- Import (.zip) - To import a project from local machine, upload the zip file of the project (with all files inside) onto Project Directory. Press Import to extract it (refresh to view the new folder).
- Export - To download a project in zip format.
- Delete - To delete a project (with all files inside).
- Execute [Admin] - For administrative purpose only.
Run SIGServer †
- Run - To execute SIGServer (./sigverse.sh).
- Check - To view output of the execution (for possible error).
- Kill - To terminate SIGServer.
SSH Connection †
- Input host name, user name and pass phrase
- Run SIGViewer.exe on local machine.
- From the top Setting menu, select SSH Connect.
#ref(): File not found: "ssh_connect1.jpg" at page "SSH接続"
- Input the server host name (or IP address), user name and passphrase on the dialogue box.
- For temporary access,
- Server host name: socio2.iir.nii.ac.jp
- User name: testuser
- Passphrase: (as written in passphrase.txt)
#ref(): File not found: "ssh_connect2.jpg" at page "SSH接続"
- Check the Use RSA key to login.
- Enable port forwarding (in most cases blocked by firewall) by the following steps.
- Check Local port forwarding with login and input the following details:
- Local port: Port on local machine
- Listen host: Listening machine(normally localhost)
- Remote port: Port on server
#ref(): File not found: "ssh_connect3.jpg" at page "SSH接続"
- Check Remote port forwarding with login and input the following details:
- Server port: Port on local machine
- Listen host: Listening machine(normally localhost)
- Local port: Port on server
#ref(): File not found: "ssh_connect4jpg.jpg" at page "SSH接続"
- * In normal cases, please use 9001 and above for local port forwarding, and 8001 and above for remote port forwarding. If the port number is currently in used, please try other number.
- Check Download shape file for automatically update shape files from server.
- Press Connect, the SSH connection is established if the message "SSH Authentication succeeded (server host name)" appears on the bottom left of SIGViewer.
#ref(): File not found: "ssh_connect5.jpg" at page "SSH接続"
Tutorials †
First Test (Tutorial01) †
- To simulate a falling object due to gravitational and external forces.
- Step 1: Create a new project
- Click the Add Folder icon on the top of the left Project Directory.
- Insert "Tutorial01" and click SAVE.
- A new folder named "Tutorial01" appears on the Project Directory.
- Step 2: Create an agent controller
- An agent is an autonomous object controlled by a controller.
- Click into "Tutorial01" and click Add File to create the controller source code.
- Insert "MoveController" and select "cpp" as the file type.
- Insert the following codes into the Editor Area and click SAVE.
MoveController.cpp
- The above controller codes do nothing except execute "onAction" on every 5 s.
- Step 3: Compiling the controller codes
- Create a file named "Makefile" with "txt" file type.
- Insert the following codes into the Editor Area and click SAVE.
Makefile.txt
- In the Control Panel, insert the project name "Tutorial01" for work/ and click Make. Refresh the Project Directory to ensure the creation of "MoveController.so" file. If "MoveController.so" file is not created, means there is a compilation error during Make. Check your programming codes. Also, in the Makefile.txt, ensure that there is no any extra space in front and behind the lines, and the spacing in front of the last line (...g++) is a tab and not multiple space bar.
- Step 4: Create a virtual world with the agent
- Create a new file named "NewWorld" with "xml" file type.
- Insert the following codes into the Editor Area and click SAVE.
NewWorld.xml
- The above codes create a virtual world named "myworld".
- In the world, an agent named "Toy_D" using the instance of "seToy_D.xml" is created.
- The "implementation" attribute attaches "MoveController.so" as the controller of the agent.
- With the "dynamics" attribute value set to "true", the agent is subjected to dynamics simulation.
- The initial position (x,y,z) and mass are set.
- Step 5: Execute the simulation
- On the Control Panel, build the project by using Build.
- Set "Port" to 9001 and "World" to "NewWorld.xml"
- Click Run to execute SIGVerse.
- Click Check to check the last line of the output is " Java VM start ok" for successful execution.
- If you see "cannot bind socket: Address already in use", just try another port number other than 9001.
Try bigger number, e.g. 9002, 9003, 9004, ... There are various reasons why the port is temporary being used.
- Run SIGViewer. Establish SSH connection under Setting. Set host name as "localhost" and port no. to "9001". Click Connect to SimServer.
- An agent in a virtual world appears as follows.
- * View controls for SIGViewer:
- Turn around - Right click
- Zoom - Ctrl + Right click
- Pan - Shift + Right click
#ref(): File not found: "toy_1.jpg" at page "動力学シミュレーションのサンプル"
- Click Send under SIM_CTRL_CMD (START) to start the simulation.
- The agent falls straight down the ground.
- Disconnect SimServer in SIGViewer and Kill in the Control Panel to terminate the simulation.
- Step 6: Apply external force
- To apply an external force to the agent, edit the agent controller as follows:
MoveController.cpp
↓
- Make, Build and Run the simulation as above.
- The agent moves forward as below.
#ref(): File not found: "toy_3.jpg" at page "動力学シミュレーションのサンプル"
Tutorial Project Files †
- Tutorial01 -
 Tutorial01.zip
- Tutorial02 -
- Tutorial03 -
- Tutorial04 -
- Tutorial05 -
- Tutorial06 -
- Tutorial07 -
- Tutorial08 -
- Tutorial09 -
- Tutorial10 -
Differences between SIGVerse Web and manual programming development †
SIGVerse Web is developed with the aim to ease and reduce learning curve for novice users (who are not familiar to Linux environment) to begin with SIGVerse development. The development process explained above is slightly different to manual programming developments illustrated in the rest of the tutorials in this wiki.
- The files system in SIGVerse Web is organized based on "Project". You can develop all related files (.cpp, .so, .xml, .wrl, .x3d, etc.) under the same project folder. By using "Build", SIGVerse Web will automatically build all the files into the respective folders of the current SIGVerse version that you are working on. This files system will provide a better files organization and enables "Import" and "Export" of projects for backup and sharing purposes.
- *Difference* In World files (.xml), the path to the controller's shared object file (.so) is always at the current directory, example:
- In SIGVerse Web, you can install and execute all available versions of SIGVerse servers in the same development environment. Because of the independent files system, the same project codes can be executed in different SIGVerse versions based on your selection when you enter the workspace.
- *Difference* To make sure the Makefile indicates the current SIGVerse version in your workspace during compilation, please make sure the first line of the Makefile.txt is as follows:
Library †
- World Gallery
- Living Room (Small)
- Living Room (Big)
- Kitchen
For any inquiry, suggestion, and feedback, please kindly contact Jeffrey [i@jeffreytan.org].
Counter: 5399,
today: 2,
yesterday: 0
![[PukiWiki] [PukiWiki]](image/Concept_logo.jpg)